With Reaktor 6 you can whip up synths and what not, I feel Reaktor synths usually sound a bit thin, but for recording projects, Reaktor is VST duct tape, used to solve simple and maybe not simple problems.
Need to flip L and R channels in a WAV file? Reaktor can do that (it's easy). Need to make a stereo WAV into a mono file and control overall volume of the result? Easy. Need to rerecord a stereo file as mono, add EQ and a tape delay, then use the whole Mishpucha as a VST in Ableton, and then loop it? You can do this with different software, but Reaktor makes it really easy. Those are some damn clever guys at NI. Audio duct tape! Yeh!!!!
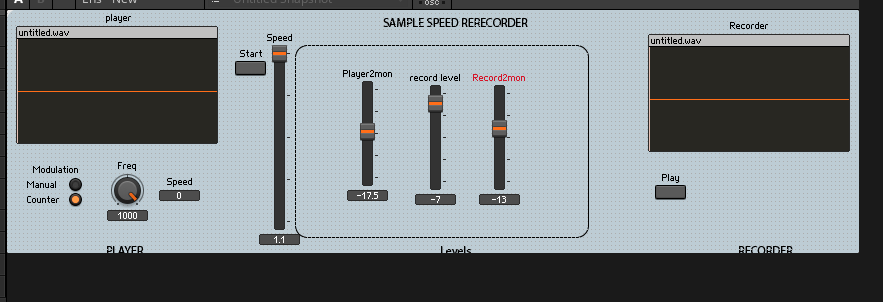
For instance: I did a session the other day where the DJ dude wanted a drum roll that started at normal speed and slowed down in a controlled manner. There are probably 100 ways to do this, but to see if I could work fast, I created a simple reaktor wav player-recorder and tied a slider to it, so when you hit a start button, it started playing, and the slider adjusted playback speed that fed into a Recorder. Save what's in the recorder to stereo WAV after the sample playback is finished and dump the modded WAV into ableton. We are done!
And of course after the session was over left I couldn't help tweak the duct tape ens file:
- The playback/record starts when the Manual "speed" slider is put at the top of its travel.
- A "Counter" that allows you to dial in the frequency at which the playback sample slows down if you don't want to do this manually.
- A switch to allow the sample to start slow and speed up vs. start fast and slow down (oh wait, haven't added that yet? Damn, you are never done with Reaktor....)
- A custom UI for this thing. Makes me look like a cool DSP dude working for Ohmboyz? Not really, this is more script kiddee than math wiz but I can pretend?
OK, in case anyone is interested, here's how to create custom GUI elements in Reaktor. It doesn't change your synth, It doesn't change your duct tape, but it changes the look and feel.
It will turn an ens., instrument etc. from this:

Into this:

(Why?)
( I have fun with messing w/ this....no other reason....)
OK What do you need to do this?
- A graphics app that can produce PNG files where you have good control of what graphic element goes on what pixel in a controllable manner. Adobe Illustrator is what I use but lots of programs can do this.
- NI Reaktor, the $199 version, not the free player. Comes with Komplete. You can't edit things with the player but you can play things made with the editor.
- Optional: Knobman, a totally great free Java based app that allows you to easily create elements like knobs and sliders to use in your plugins--like the ones we make here.
- Some time to mess around and have fun with this mindless Audio DIY distraction.
First figure out the size of the ensemble background, (you can guess and tweak) for my sample player/recorder/speed tweak ensemble it's 1000 x 300 pixels W x H.
Using Illustrator, I created a background PNG and gave it a kind of blue meany color.

And then added some basic elements. Yes you have to know some Illustrator basics to do this, but it's not that hard a program to use to make basic shapes like rectangles and whatnot. As I always say: if I can do this anyone can do this!

Illustrator has a native format on Windows: *.ai. Assuming you're using that, save the .AI file, and then file > export as PNG. Make sure PNG backgrounds are saved as transparent. If you use a different program (Linux GIMP comes to mind) your process for this will be different....but at the end of the day, you want PNG graphics with transparent backgrounds--those work for me anyway.
Hint: as you go, do many "saves as", use github for version control, or whatever. And: Always save versions of the graphics file in its native format (.ai or whatever) as well as the exports of PNG files. So you want "slider1.png, slider2.png etc. as you tweak things more and more. I can't tell you how often I have to go back to previous versions for whatever reason!
OK with a working PNG file, let's add the background to the ensemble.
- Open the ensemble and click on the EDIT button, then unlock the panel:
So, go from this:

To this:

We now see a grid of dots in the background.
We need to change the background image:
Click on VIEW tab > STYLE > Bg Image:
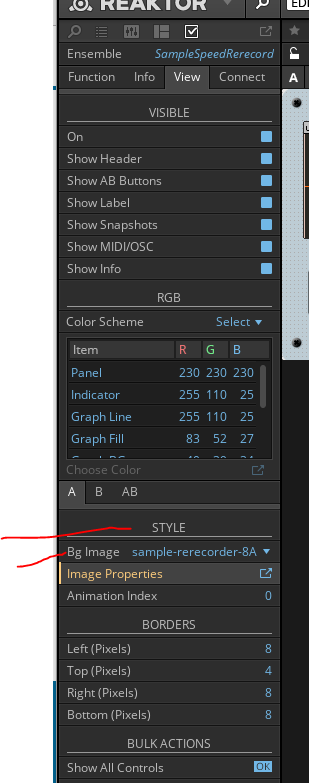
And choose the PNG image you just created. You use open from file...etc--this is self evident?

Once selected you should see the new background with the original buttons and sliders. Something like this:
Next it's a matter of modifying the background elements and replacing each slider etc. with whatever new artwork you want. You can change some, all, or none. As Bob Ross used to say--it's your wet on wet. Wait did he say that?
To change out elements, select by clicking on the component in the Reaktor editor and then click on VIEW tab > Image. Select a PNG file and see how it looks.
Let's examine that a bit more closely:
to make the elements not slide all over the place, go to your ens and add an image element. Now choose some sort of graphic you can pin to the corners. I usually put small Phillips screw images in each corner of the background image, or fully transparent 3 x 3 pixel PNG files. You may or may not want to do this but here I did. It defines the boundaries of the plug in and makes it so things don't move all over the place as you work.
After inserting these corner images into the ens, turning them on but turning off their labels; you are usually going to want to not use NI labels, rather text you create from your graphics program.

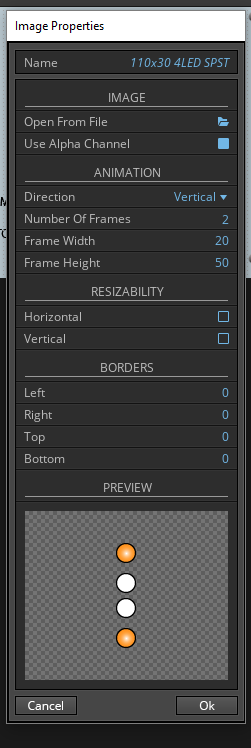
Once your "canvas" is set, you can tweak each image and its properties. For each PNG file you can drop into your Ensemble or instrument or whatever Reaktor widget, below where you see the link to change the graphic, there is another link for "graphics properties". Often the default values work, but one value that may need adjustment: Reaktor will need to know how many frames a graphic element has. A single item, like a Phillips screw, obviously has one element. But for a button, a switch, a knob, anything that is treated a more like a cartoon, you will have more. For a simple switch, there are two, one with the button on, one with it off, get it?

This is a 60x30 PNG, with each ellipse exactly 30 pixels total on the Y axis, and 60 on the X axis; they are shoved together perfectly without any space or slop. A slider can have 127 or 128 images. You are answering the question: how many frames does my "cartoon" have?
In fact, you'll quickly find that this sort of thinking is needed when working with Reaktor graphics:
- Know your pixel count at all times (put the pixel count into the PNG filename if that helps?)
- Don't be sloppy about X and Y pixel count as you create your graphic elements. It takes me more time to get things right when sloppy vs. when I'm careful.
- Same idea again. Unneeded spaces, incorrectly cropped PNG source files, misalignments, asymmetries, etc., will make your graphic element almost always look crappy. Work clean and work slowly.
- Always save everything you use, and even what you don't use, as PNGs or another compatible file format (PNG always works for me). You want to build up a library of switch PNGs and whatnot and use 'em over and over.
- Be conscious of how many frames any graphic needs.
- Be ready to experiment.
As I say "be careful about your pixel count" what does this mean? How do you know if you are creating an element that is 50H x 25W pixels, with text at 10 x 10?
Managing pixels, rulers and guides varies from graphics program to graphics program, but in Adobe illustrator for Windows 10 it's pretty easy:
Managing pixels, rulers and guides varies from graphics program to graphics program, but in Adobe illustrator for Windows 10 it's pretty easy:
Edit > preferences > guides and grid
Choose 10 pixels with sub every 10 (works for me anyway):

Say OK
Then make sure grids are turned on and elements snap to them: View > show grid and view > snap to grid. That tends to make things line up.
One tricky thing: dealing with a 2 position switch. In the ENS here, that's the MANUAL/COUNT switch. For this I created this 20wide x 100high PNG file.
Note the spacing, it's not spread out equally--the top and bottom images need to touch. Got that by trial and error.....
And then set image properties like this:
The final thing to discuss is the sliders. I created these with Knobman. There are good tutorials on line for this software, as well as several really good knob files including knobs, buttons, VU's etc. you can download for not a penny, but one thing to reiterate yet again is that the number of frames in Reaktor always needs to match the number of graphics elements created in Knobman; otherwise the slider or knob image jumps all over and looks really bad.
I created a knobman 180 x 40 sized slider with 0-127 frames which must be mimic'd here.

OK that's it for now. It's off to the 4th of July celebrations but when that's done and I have a few of these I'll try to post a few reaktor things on my site.


thanx 4 share this quick intro.
ReplyDelete