Thursday, September 26, 2019

The new "Virtual Breadboard" App and The Delight of the Delay

Note: The backstory about Virtual Breadboard, version 6.0.x, one of my favorite electronics software programs for AudioDIY, can be found in the earlier post here. You might want to glance through that before reading today's blah blah ginger blah blah, otherwise what's here might not make sense.

Hello Again: this time I'll be writing about the "new look and feel" VBB.  It makes getting Arduino projects going on easier than before and as I see it, easier is always good.

You can only get the new VBB app from the Microsoft Store as far as I can tell (and yes, it only runs on Windows). So: Sign up and give 'em the big data.

Link to get the app at the MS store for the new VBB is here. Sorry Mac and Linux users, dig out that crappy Windows 10 laptop, throw some Mutable stickers on it, get on over to Starbucks, and get with it.

Cuentas? The new VBB offering is free from the MS store, and freebee is usable right out of the box--unlike VBB 6.0.x the for-free version includes a working Ardiuno Duo SIM. Yeh!

To get the tired but mandatory blink LED going, follow the tutorial here.  But I can make it even quicker:
  • create your Arduino virtual breadboard with an LED in D13 and power it on
  • load up the example > basic >"Blink" sketch from Arduino IDE (yes you have to use an Arduino IDE outside of VBB still), 
  • compile your sketch to hex (export > export compiled Binary)
  • Find your export (sketch > show sketch folder would be one way)
  • drag the hex file over the Arduino in the SIM.
  • Blink away!
Poof! It's that easy, and for me it worked.

If you change your code, same as VBB 6.0.8: you don't have to power off your SIM and restart it. Copy the new hex over the Arduino SIM icon and changes are seen pretty much immediately. Yeh!

But other than this blog, what is really free? For an extra $30 a year you get more cool VBB components, like a (possibly indispensable) terminal for debugging Arduino using serial.begin() type code, a square wave function generator, a very cool function creator (still want to do a post just about that!) and some other new features I've not gotten into yet.

So with that in mind let's get to some AudioDIwhY.....goes like this: Over the next few weeks I am going to simulate then build a gate delay circuit for modular synthesis. Update--fabbed, stuffed, and works, see post here.

This is something that could be done with 555 chips or whatever, but as far as low parts count, nothing will beat an Arduino for on-off things like this, right?

SIM of my Gate Delay

Here's the idea: a gate signal is delayed with the "DELAY" pot from in to out, and its length at output is determined by the setting of "LENGTH". So far this is all pretty easy 555-chip stuff.

But here's what's a bit trickier maybe: there are switches that follow or ignore the incoming gate off status and start things over as needed. So if you are in the middle of a delay, the EOGD switch is set to follow, you have nothing at Gate out, and the input gate signal suddenly goes low, the circuit starts over.

Same if you are in the middle of a delayed gate, whose length is determined by the LENGTH pot. In follow mode, as soon as the gate goes low, everything starts over and waits for a new gate signal no matter what. In ignore mode, whatever is happening with Gate off is ignored.

The whole idea is to provide more flexibility with how gate-offs are handled.

How will this sound with real gates, EGs and what not?  I have no idea, but I need some gate delays for my modular rig and am not sure there are any others out there quite like what I describe here.

Let's get coding! Instead of winging this, I drew up a logic chart (click on the full size version below)


I'll be referring to that as I program the SIM.  There may be mistakes....

And one last thing: the new VBB has a lot of the same shortcomings (features?) of version 6.0.8.  This is still primarily an digital only sim, so things like this simulated DVM in this "analog" setup won't work:


But if you monitor an Arduino analog port it will:


Update 10-12-19: I have the gate delay sketch working on the bench.  Part II is here.

Up next: I am sending boards for a 3340 based VCO off to fab soon, so while I'm waiting for that I'll try to write some code for the gate delay and post it. For clarity I probably won't use "pure C" which you can read about here, but who knows. Until the 3340 boards come back: No fumes!

Tuesday, September 17, 2019

Balanced Quad Line Receiver

For me the "why" in AudioDIWHY is never about saving money. By the time a board gets fabbed, stuffed, tested, debugged, a front panel made and so on, the money for a Doepfer or Boss or Behringer for a consumer version of the same thing might seem cost less.

But maybe not this time?


Finished Module with FPE front panel


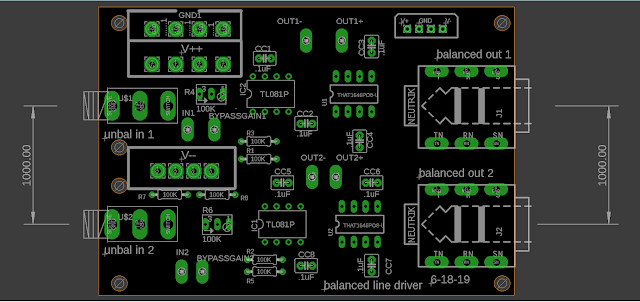
The back story: I had four unbalanced synthesizer ties in my home studio that needed to be amplified by about 12db and balanced. I was using two Aphex 124's for this but one went dead, no idea why.

(Note: if you need to know what this "balanced audio" thing is all about, a good quick explanation from MOTU can be found here).

Both Aphex units were getting old and took up more room in my rack than I liked, so I priced out various replacement active balanced audio line converters but all seemed a bit pricey: Intelligel's is about $260USD for quad; $40 for one channel if you want to buy a tiny Intelligel I/O widget that goes into their skiff rack; Whirlwind's offering is about $130 for 2 channels, Aphex's level shifter is about $300USD for stereo (yes, it's I/O and O/I so it will cost more) and so on.  Nothing too affordable here!

Granted some of these have extra features like level meters, but really all I need is to balance the audio and get a +12db boost. How to do this cheap?

How about this: buy some THAT line driver IC's, RAP2CV jacks and TRS 1/4ers from Ebay, get five PCB's prototypes fabbed in China for $5 USD.

Is Audio DIY getting old hat? This all feels familiar. I designed the PCB in Eagle (I had to conjure up a Neutrik TRS Eagle device--I added this to my madbean JACKS.LBR file--I can share that if you are interested in adding this TRS part to your Eagle project, comment below.....)


Is that the DHL plane flying over my house with PCBs from China? At 3AM! Could be!!! 

Unwrap the boards, pull the parts, insert, solder, power, test, repeat.

The PCB for this project uses through hole parts--if I had used surface mount THAT IC's I would have saved another $3USD.


The heart of this circuit is a THAT chip, the 1646. Small quantities are available from Mouser for about $4.50USD each; so for quad you are looking at $18. The TRS and 3.5" jacks (you may want to redesign via Eagle for RCA input? TS?) are easy finds via Ebay or maybe at a surplus place.

Everything else I used--other than the jacks and 1646 chip--were from my parts box--really all this is is an op amp buffer/gain stage in series with the 1646. Not sure it could get much easier.

Applications. Running audio long distances is best accomplished using balanced audio, and you'll get with the THAT 1646. Another common application for an audio line driver is converting a consumer audio device, like a CD player, to the professional "+4 balanced dBu" spec. If you have -10dbV gear that needs to get amped up to +4dBu I calculated that the op amp (IC1 in this circuit) needs to provide about 4x gain, along with gain provided by the THAT IC. I tried to make the design easy to mod--drop in different values in the op amp gain stage, or make it unity gain using the "BYPASS" test point hooked up to the top of R2--whatever you need.

So for -10dbV to +4dBm conversion, try 50K for R5, 250K audio taper for R6, and 100K for R2. Tweaking that on my bench got me close to +4dbU from a -10dbV sine wave test tone.

A good article on op amp only equivalent circuits for balancing and unbalancing audio can be found here. For balancing a synthesizer output, you may need to use the resistor values you see above: all 100K. That's what I used and it worked.


It only took a few hours to build 2x of these (4 channels total) and it all worked the first time.  

Still need to add bypass caps, do that after the basics work.


One more benefit: I have 2 identical boards, 4 channels total, that are easy to A-B.  I decided to put fancy and expensive Burr Brown OPA624's  (since I'm saving money here?) and 1% resistors in one, and ancient but not too horrible CA3140's and 5% resistors in the other. Will I be able to hear a difference? Try different op amps, listen to them....Update: can't hear any difference. Maybe it's just me, my ears, too much loud R&R. Perhaps it's almost always OK to use whatever you have in your junk box as long as it doesn't smoke.  

Butt Ugly!

Warning: Butt-Ugly front panel! For testing and tweaking I modified an old 2u Frac panel and used Ptouch tape for labeling. No, that's not how it will look if this device continues to get used (so far it works great so it probably will). I am ahead on budget here, so I will spring for a $45ish panel from Front Panel Express. 

Update: FPE front panel is done--see the opening photo for this post.

UPDATE 12-28-19: after finishing this board, I found out that Sparkfun has something like it: here. No op amp to adjust incoming gain though; all SMT. 

Yes, if you add up the hours I have with design, stuffing, testing etc. I think it might still be more expensive then Intellijel, but still, maybe not.  Remember that unlike Burr Brown IC's the fumes are free. The mask may not be.

Saturday, September 7, 2019

Skiff to my Loo! My first SKIFF Friendly Synth Module--SEM Style Attenuator Completed

Update 9-23-22: I was unhappy with the way I laid out the bias+ and bias- buffers subcircuits in the circuit below, so I redesigned the attenuverter PCB.  Build the newer one--not this one--I think it improves things in terms of flexibility. Post about the rev 2 PCB is here.

For some reason I have started using SMD parts and start designing and building skiff friendly modules.

"Skiff" in synthesizer terms means the module is about 30-40mm deep or less.

That's the thing about AudiDIWhy, I can do this any way I want. The world is moving away from depth?

I already bought some tools for SMD one-off fab--read about that here....  

This time I build an SEM style attenuverter. Blog post part one, where I stripboarded an ugly but functional (and highly skiff unfriendly) Tom Oberhiem inspired attenuverter is here.

 Today's post may not make a lot of sense if you don't skim through that first--the CTPOT is an interesting component, and I added some bias offset tricks to the original design.
 
First, I used my SEM inspired attenuverter schematic in Eagle, capturing the strip board mock up to create a PCB for the project. The Thonk 3.5mm jacks for Eagle come from the very useful MusicMachineModular lbr file, which you can get here. (Thonk you).


The only slightly tricky thing was finding an Eagle device definition for the center tap pot. I searched high and low and couldn't find one so I had to create the device myself, a tutorial about how to do that is here:

The center tap pot....

In Eagle the CTPOT now looks like this:


OK with this Eagle part good to go, I created the board:


Also, I had to fabricate a small daughter board for the Centertap Potentiometer since it sat too low on the  PCB:

The board accommodates 2x CTPOTS; for this project I sawed the board in half.

Now what? I realized after sending the gerbers off to China that I should have laid out in the pots and jacks for the main PCB in a more logical way--say every 200 mils. That would have made laying out the front panel a lot easier. But I was in a rush and I didn't. I'll deal with that later....

PCB is back from China, let's get the board going--I laid in the op amps and a few resistors:


With Skiff there is no hook up wiring so it's a fast build. 

But the board didn't work first time because the TL084 was soldered in upside down.  I wicked it out, and soldered in a correctly oriented replacement. Joy: now the attenuverter works.

Independent bias offset on each channel; normals for easy inverting. The joy of fuming!

Front Panel Fu: Since I didn't lay the pots and jacks out in a smart way, they landed on the PCB where ever, I took caliper readings of all the dimensions of the completed skiff PCB, laid out a potential front panel in Illustrator, and printed out a mock up on a paper sheet, then cut it out with an Xacto knife.  


After about 8 tries: the paper mock up fits. 

Final step is a FPE panel for this.

Ten days later it's back and yes, it fits.

Done!  You can get Eagle files, etc etc for this on my webpage, here.


I initially put this SMD stuff off because I was scared to try something new. Turns out it's probably easier and quicker to fab your DIY projects this way in some situations instead of using through hole and hook-up wire. 


OK that's it, until next time: don't skiff the fumes.

FPGA's 2025 Part II: Lattice/iCEcube2

Hello again , continuing on my quasi-annual attempt  to get started with low cost Field Programmable Gate Arrays , or FPGA's.  How will ...