Friday, September 23, 2022

Improving the SEM Attenuverter

 Hello again! A few years ago I designed and laid out an Oberheim SEM inspired attenuverter, posts are here and here.  

Never being 100% happy with anything I do, I redesigned the main board to give better user control of bias inputs. Today's post goes over the updated circuit design.

Improved attenuverter module in FRAC format


Let's look at the bias input buffers found in the initial design:
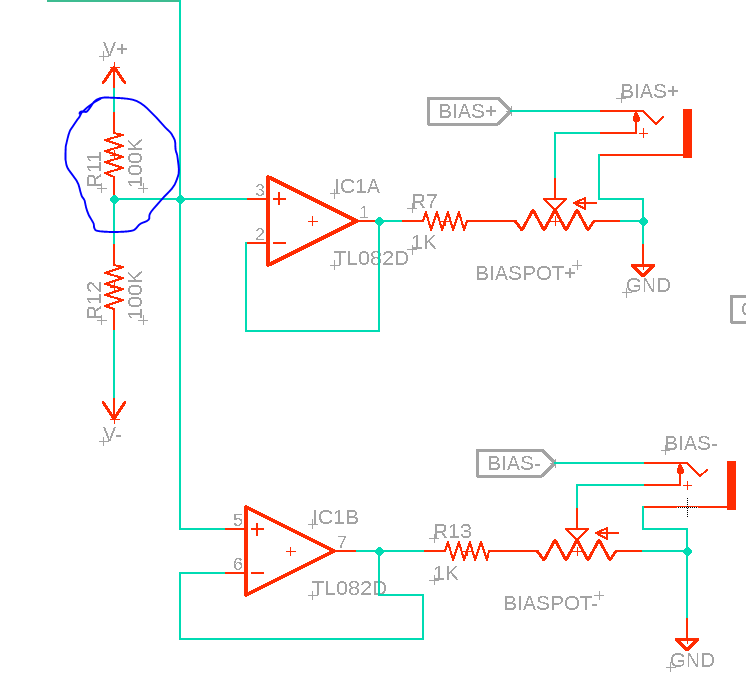
Original design

First off, the 2018 design has a glaring typo: pins 3 and 5 need +5V at input, not 0V, so I don't know what I was thinking with a 100K/100K voltage divider between the rails. I used 47K for R11 in the actual build, but still, the circa 2019 schematic had this glaring mistake.

Here is the new design:

Update!!

Besides fixing R11's value, the Bias pots now control levels found from the CV **or** the signal found at "Bias+" and "Bias -". This meant the user has greater flexibility for controlling the input bias CV using the B100K pots.

The rest of the schematic remained unchanged.

Another issue was that the PCB was tall to comfortably fit into a Frac case. This is fixed in the gerbers found on the PCBWAY project page, here, and the github for the build, here. If you want to build this attenuverter for Frac, make sure to download and fab the standoff daughterboard for the CTPOT, it is needed for the layout.


With the PCBs trimmed to size it was now a matter of populating it.   

The latest Attenuverter PCBs were provided by this blog's honorable sponsor, PCBWAY.  I would be very grateful if you could check them out for your next project.


A daughterboard is needed for the center tap pot--read more in  this previous post.  


The center pot shaft had to be shorted using a Dremel tool.

ready to test!

I like it when it works the first time!

What's next?  I have new RP2040 dev boards to experiment with, more on that next time. I also want to design a front panel for this attenuverter for Eurorack....(update--Euro port of this asttenuverter is done and works--go here).

Until then, don't breathe the fumes!

Monday, September 12, 2022

Cloning the Moog CP3 Mixer

I read that the secret sauce that makes the Minimoog/Moog Modular sound so damn good is the subtle distortion introduced by its audio mixer.  True? False? 

Let's build one and find out! 

For this post I laid out three PCB's the capture Moog's legendary CP3 design, got them fabricated at that blog's sponsor, PCBWAY, then built a Eurorack format skiff clone:


CP3 (io) CLONE WARS

Let's go!

I found the original Moog CP3 schematic--looks simple enough--here.  

I captured the CP3 schematic, then laid out PCB's using Eagle; to save space I used 3 PCBs stacked in a skiff setup: front panel, a board for pots and jacks, and the mixer PCB.  

Front Panel is designed to Euro spec


100 mil edge connectors were used instead of hookup wire...."skiff"
 depth


Next I sent the gerbers off the this blog's trusty sponsor, PCBWAY; they were back in a jiffy, good to go:

Thanks to PCBWAY for sponsoring AudioDiWHY, you can help this blog by checking them out.

Most of the CP3's components were commonplace and could be found in my junk box, but I had to order a some pots from Tayda, and I found 3392 and 4058 transistors for about 70c each from Mouser.


On to the build....  

Very straightforward--the entire process took about two hours.

The board accommodates the CP3's original 3392/4058 transistors, which seem a bit rare, as well as easier to find 2N3904/3906's.  Hint: If you build this CP3 clone, use 2x NPNs and 2x PNPs.


I built two CP3s; one used 3904's/3906's; the other the 3392 and 4058's "NOS" components.

The 2N3904/06 build worked flawlessly the first time. Joy! However, the 3392/4058 version didn't work at first, I thought it was my layout, since the pins on 3392 are different than the 3094, but no, that wasn't it; turned out, Mouser put the wrong part in the bag:


What is a JCJ111 anyway? A Jfet, I think. I called up Mouser, they were very nice about this, and sent me 5 3392's to replace the one transistor that was misshipped. Hey, it happens right?

I replaced the JCJ111 with a 3392; afterwards, the NOS board worked.  

Overall this was a pretty easy design to capture, lay out, and build. 

If you want to build one, get PCBs, BOM, gerbers, eagle files, PDFs of the layouts, etc., from PCBWAY community (here) and/or my github page (here).  

Which transistors to use? 

To my ears, the 3904/06 version sounded a bit better than the NOS unit--a bit less noise, with the same pleasing distortion when levels were turned way up.  

So--if you build this, save time, money and trouble and just use 3904 and 3906's. 

Using the CP3

The "click filter" is a passive low pass filter in the CP3's signal flow, not sure how much I will use it, but it indeeds knocks a sizable portion of the high end off the circuit's outputs.

I used tiny trimmers for the input level adjustments to save space, that makes the panel a bit crowded, but hey, in the Eurorack world, things get crowded.  

Overall, the CP3, to my ears, does indeed add Moog's signature Minimoog/System 55 distortion to a patch: subtle, warm, and fat sounding, especially with ramp waves. 

I am happy with how this DiWHY project came out and will use these 2 mixers a lot going forward.

If I get time I will record before/after wav files, photograph scope shots of distorted waveforms, etc., but right now it's back to the day job (post Covid?) and on to new things.  

CODA 

Still more analog, less digital, next time. After many long months, I am going to try to fix a few problems with an attenuverter circuit from several posts ago. See ya.

Anything to Clock Subcircuit

Readers:  If you want to build the project featured in today's post, please go to  PCBWAY's  Community pages --a gerber ready to dow...