Any day now....
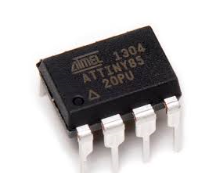
In the meantime I thought I'd keep working on my Arduino skills, this time working with an ATTINY85.
Part one of my ATTINY exploration is here.....
Cutting the BS and getting to it--pros and cons w/ working with an ATTINY vs. all the other Arduinos out there. Why use it at all?
Pros:
- ATTINYs are super cheap. I bought 4 of them for $12 on eBay. If you can work with SMT, it's even cheaper.
- They are super small. Tiny? Sure. In Eurorack land where everything needs to get tiny, that's good.
- You can program a few of them to do the same thing and then drop them into your projects like you just fab'd up custom IC's. Gate to trig? Gate delay? One Chip LFO? Yep.
- Most all the important commands you can get out of a Nano or whatever are supported here. Pin change interrupts for instance? Yep. I'll get into that in the next post, which I'll upload tomorrow.
- You can get an all in one programmer for about $16 USD complete with handy built in blinking LED. But watch out for this gotcha....this one drove my crazy....on Linux or mac programming code into an ATTINY works OK. Then suddenly quits. Like you unplugged the programming board...but you didn't. Why? Turns out to be a USB permissions issue. To fix follow the instructions in this link or just do this : open your terminal and run lsusb from terminal. Then chmod the crap out of the usb ports with this: sudo chmod 666 /dev/bus/usb/0xx/0yy where xx and yy are the device ID's used for the ATTINY programmer. You can make that change permanent by following the advise here. Otherwise the "write to chip" commands in Arduino IDE become caloric; i.e., they donut work.
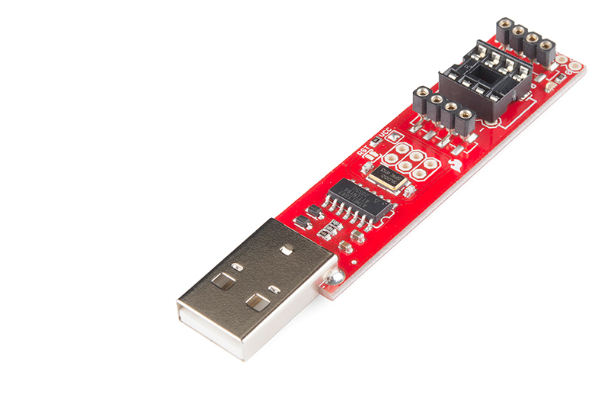 |
| The AVRTINY programmer. $16USD!!! |
And now....Cons:
Biggest issue, con number one! There is no easy way to debug these damn ATTINY rascals.
What does this mean?
On the Nano, you use serial print commands for this, to see if a variable is working the way you want, for example:
void setup()
{
Serial.begin(9600);
}
x = 100; // or whatever other bozo value you are trying to determine
Serial.println(x);
delay(2000);
If you expect to see a 100 here and get 0 in your serial monitor, that tells you you screwed up your code!
On the ATTINY, this debugging methodology is not so easy. That's because serial commands are not supported by default at all!
The workaround: There are lots of fixes for this. After digging I found a nifty add-in library called TinyDebugSerial. I liked it because it was easy to implement. And if you read this blog at all you know I like easy.
You can get the add-in here.
Drag the files into your Arduino library folder, then try this as code:
#include <TinyDebugSerial.h>
void setup() {
#include <>TinyDebugSerial mySerial = TinyDebugSerial();
mySerial.begin(9600);
}
void loop() {
mySerial.println("hello world!");
}
OK, serial print data, streaming at 9600 baud, now shoots out ATTINY85's "pin PB4" (that's pin 2 for those of us in the DIP8 real world). In this case "hello world" over and over.
But....Where to hook up the TX out? So you can read it, Elmo??
I ran it to a RX pin of an Ardino UNO via a 220 ohm resistor--hooked the UNO up to a 2nd USB port in my Linux laptop--fired up a new IDE window for the UNO--set the USB port in the IDE for the uno--and (finally) read the serial strings out of there. Worked!
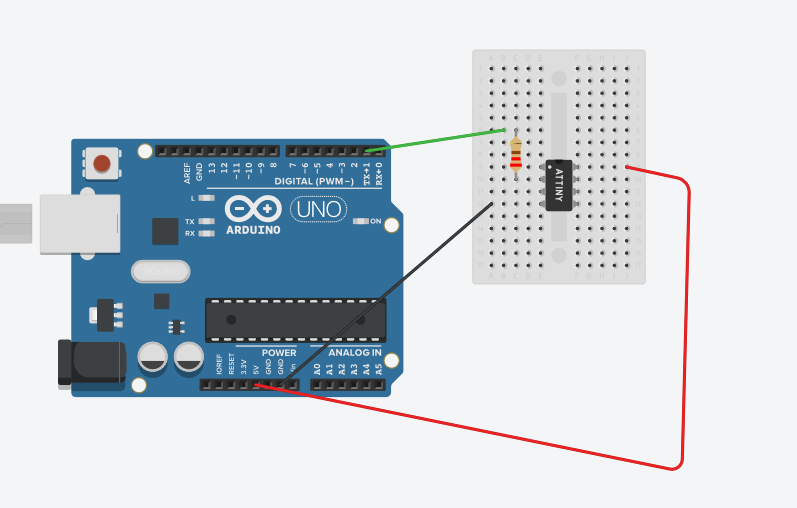 |
| Using an UNO to get tinydebugserial output from an ATTINY. Wire it like this.... |
Con #2: there just aren't that many pins to work with. This is an 8 pin chip and 2 of them are for power. 1 more is for reset, and it can do other things, but not easily. Not much more to say there. Sorry.
Con #3: the pinout designations are odd for ATTINY. I found for analog in I had to use something like "A0", "A1" etc. For digital I had to use "3". I had to check the pinout diagrams online more than a few times, and for me, screw around a bit....
 |
| For instance, analog Pin A2 is tied to physical pin 3 and A3 is tied to physical pin 2. But why, Scottie, why? |
Con #4: ATTINYS are slow, slow, slow, SLLLOWWW and then they are slower than snot!
Overall--I almost gave up a few times--really, for audio DIY why use ATTINY at all and not just a Nano? Or Uno? Or Due? Or Dookay?
Not sure I can answer that....but then I came back to it...I bought the damn tiny things--I just have to figure it out.
After a few evenings I did get it working, and with debugging set up could start to do useful things. So yes there are probably more cons than pros. I programmed it anyway. Guess it's just the way I am.
Doesn't mean you have to be that same way.
Soon to come--using interrupts to track CV gates with these little turds. Until then.....well you know.


If your ATTiny85 is too slow, you should check the fuse programming. Most likely the CKDIV8 fuse is set and the clock source is not the PLL Clock (16MHz)
ReplyDeleteUse Burn Bootloader in the Arduino IDE to set the fuses.
Another problem is the use of the Arduino framework itself.
There is a ton of house keeping going on in the background that keep your ATTiny busy. It also blows up the memory footprint. A simple blink program with the Arduino core needs a couple of hundred bytes, compared to some 20-30 bytes if you use the bare metal AVR libraries.
Regards,
Thomas