UPDATE: 9-17-23: I haven't used VBB for a bit; the VBB.exe app mentioned in this post appears to no longer be available. You now get Virtual Breadboard from the Microsoft Store.
Once installed the new version looks like VBB.exe. You need to pay $30USD to run a simulation (apparently you can lay out parts in the "free" version, but not do a simulation until you pay).
The Windows store version gets (mostly) one-star reviews from its clientele...
what I write below is deprecated....four years is centuries in the computer world.
As an alternative, wokwi looks interesting. I think I am not going to follow VBB any further.
=============
Another post for the world of AudioDIY and Arduino.
This time let's look at a new Simulator I have been messing with called Virtual Breadboard or VBB.
The background:
I stumbled upon VBB while experimenting with some unrelated C programming at my day job.
VBB is a cool simulator but not nearly as straightforward to use as say Tinkercad--VBB does a lot more, but with the additional features adds complexity.
The more I use VBB the more I like it....
I wanted to write down how I got VBB to work with the Arduino IDE. Hence this post.
Goes like this:
Tinkercad Circuits is cool but lacks a wide range of CMOS chips to play around with. And you know how DIY folks love CMOS--the 4051, the 4049, the 4066--on and on--these IC's are our friends.
The more I use VBB the more I like it....
I wanted to write down how I got VBB to work with the Arduino IDE. Hence this post.
Tinkercad Circuits is cool but lacks a wide range of CMOS chips to play around with. And you know how DIY folks love CMOS--the 4051, the 4049, the 4066--on and on--these IC's are our friends.
It'd be nice to have more CMOS SIMs at our fingertips.
For this let's take a look at VBB:
First the bad news:
Here's the quick way to get this software set up to program using the Arduino IDE--and I will demonstrate by creating the same old tired blinking LED you've probably seen a thousand times.
Next:


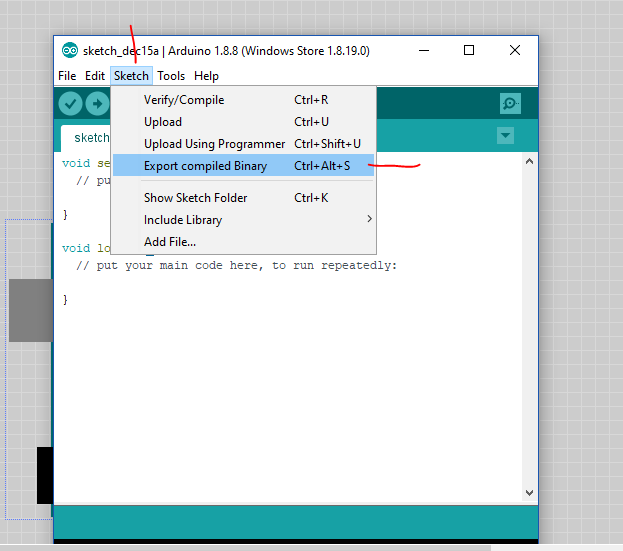
In the Arduino IDE, issue the command Sketch > export compiled Binary:
Go back to the running SIM: The LED should blink, It did for me! Yes you programmed this blink simulation action by creating the hex dump and then having VBB read it--you programmed the SIM with the Arduino IDE.
Cool!!!!
Now make sure you can change things:


Until next time, breathe the fumes, but only the simulated ones!
For this let's take a look at VBB:
First the bad news:
- For SIMS using Arduino, VBB costs $30 per year. The free version doesn't support Arduino. That may not break the bank--and once you get VBB going you get a hell of a lot for $30 a year--but it's notable that it costs anything at all considering that TinkerCad Circuits is free. But then, this Blog is free as well. Boing!
- VBB is only available for Windows OS. I try to remain positive at all times and as a Linux guy I look at that like this: I figure VBB is maintained by one or two programmers (?), working out of a garage or basement maybe, so don't expect VBB to have an huge army of programmers porting VBB to every platform out there you can think of. So, Marky Mark: shut up and get Windows going....
- VBB is not documented well by 3rd parties on Youtube, including some baffling tutorial videos that I couldn't follow at all. I mean what the hell is this? It seems to demonstrate VBB and Arduino, using methodology pretty far from the VBB tutorial, using an Atmel chip that the current software doesn't seem to contain. hello?
- VBB almost exclusively simulates digital circuits, not analog ones. There are no op amp chips for instance in VBB. There are in Tinkercad and Fritzing. This makes VBB good for banging together things using CMOS and 74xx chips, but not analog simulations of VCAs for instance. However there is a "function" component in VBB that can be used to (say) add two voltages together--op amp type stuff. Very cool indeed. Maybe a topic for another post?
- VBB includes a whole crapload of CMOS chips to mess with, along with function generators (squarewave only), voltmeters, PWM, D to A, and other goodies very useful to Audio DIY folk and Lunetta devotees like me:
 |
| This is only some of it!!! |
- Like Tinkercad Circuits, you can program your SIM with the Arduino IDE (once you set things up correctly, more about that in a bit.)
- VBB doesn't bog down as badly as Tinkercad under normal to heavy use.
- Unlike Fritzing, VBB is currently maintained. Update: wrong--Fritzing has a new release as of Sept 2023 (here).
- VBB includes a few extremely useful I2C chips for AudioDiWHY in its SIM including the Maxim DS1803 digital pot. Nice!
- Since the SIM runs off compiled Atmel binary code, if you can find the library for whatever you are doing, and can successfully compile your sketch, you can probably use it in your SiM.
- I wrote to VBB tech support a few times now and the tech there got back to me fast--like, a few times, within an hour. Unusual in the tech support world--hats are off!
SETTING UP VBB
VBB is natively a java app, not C, so you have to tweak things a bit to Arduino C programming going.
Here's the quick way to get this software set up to program using the Arduino IDE--and I will demonstrate by creating the same old tired blinking LED you've probably seen a thousand times.
- You have to have Windows 8+; I use Windows 10 Pro.
- Make sure you are using VBB.exe desktop app 6.0.8 or later. The instructions below may not work with earlier versions
- Download VBB from MS store. It's free, but to simulate Arduinos (and other popular MPU's) you will need part with some dough....if you are still interested, purchase the $30 a year Proplan.
- Create a username and password for the VBB "cloud site", virtualbreadboard.io. You will need these credentials later to launch the desktop version of the software.
- Download the VBB desktop 6.0.8 app here. For this blog post, we are going to use the desktop version, not the MS store version, of the software. UPDATE 6-21-19 I have been told the desktop version will be discontinued at some point in favor of the W10/MS store version. I will update this post when I know more. UPDATE 9-17-23. Yes, only the MS store version is now available, VBB.exe is gone. Oh well.
 |
| The VBB "app". Cool, but for this post I focus on integrating the Arduino IDE with the desktop version, VBB.exe. |
- Launch the Desktop version of the app you downloaded.
- When launching vbb.exe, you will be asked to log into the virtualbreadboard.io site, which will allow the Arduino "add on" license to do its thing.
Next:
- Download and install the latest Arduino IDE on the Windows 10 system you will use for your VBB simulations. No, VBB doesn't have the Arduino IDE "built in" the way Tinkercad or Fritzing does....you have to install it.
- On this same Windows system, make sure if you double click a .INO file the Arduino IDE opens, not something else like Notepad or Wordpad. So create a file called "test.ino", save it, double click on it, and see what happens. If double clicking an INO file doesn't open the Arduino IDE, follow the directions here to fix it so it does
- Open up VBB and create a new project, here for almost no reason at all I call it "spanky2"
- Drag an Arduino into your project:

- Add an LED on PIN13 and a 1K resistor to ground like this. Note we are using pin 13 connected to the resistor to the LED anode.

- Highlight the Arduino in your sim, go to the right side of the IDE and click on the 3 dots to the left of the listed "AVR app". You may have to click on "Arduino IDE" or whatever is listed there (might be "sleep") to have the 3 dot icon appear.

- In the dialog that appears, choose the Arduino icon:

- Go back to the main view and start the sim by clicking the power icon in the top right:

- Arduino IDE will open with a blank sketch. Yeh!

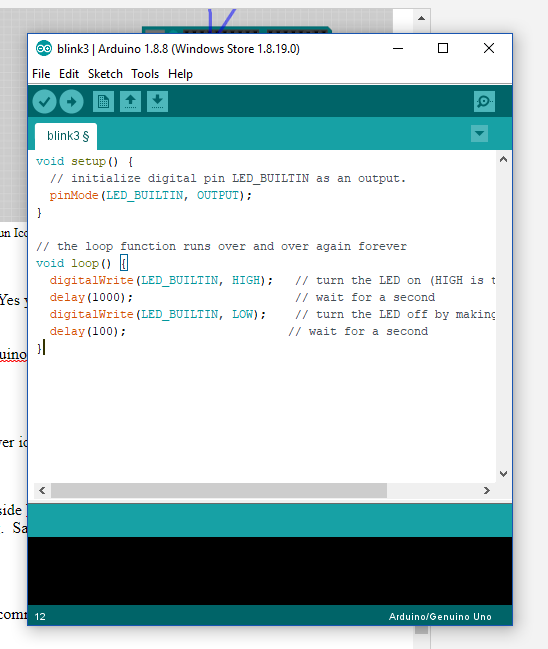
- Copy your tired blink code in there:

In the Arduino IDE, issue the command Sketch > export compiled Binary:

Go back to the running SIM: The LED should blink, It did for me! Yes you programmed this blink simulation action by creating the hex dump and then having VBB read it--you programmed the SIM with the Arduino IDE.
Cool!!!!
Now make sure you can change things:
- Go to your Arduino IDE (It's outside VBB--you have to have both running at once--you can alt + tab to it) and change something. Say make the "LOW" 100 MS sleep but leave HIGH at 1000:
- In the Arduino IDE, Reissue the command Sketch > Export Compiled Binary

- This overwrites the hex file that the SIM reads when it runs.
- You don't have to do anything to VBB--just leave it running. The blinker rate is now 1000 on then 100 ms off, give or take. The code change will be visible almost immediately--
"Export compiled Binary" is essentially the same as uploading code to a physical Arduino from your PC.
- Make changes to the IDE and issue Sketch > export compiled Binary
- Make changes to the VBB SIM project and file > save
- Run the SIM in VBB.
- If you're just changing code, you don't have to stop the VBB Simulation; if you want to swap out parts on your virtual breadboard, you will have to stop the SIM, make your changes, and restart the SIM.
- In any event as long as everything "lives" in the same folder, one component will be in synch with the other. Go A's!
UPDATE: To further understand VBB, I simulated a 5 Channel 4051 CMOS based audio/CV switcher. Incoming 0-5V CV determines which channel at input is sent to a common output. This is a very simple circuit if you use an Arduino and was easy to implement using VBB. In a future post I will give more details but the sim looks like this--and I'll try to build a "real" module, that I can use in my modular synthesizer, based on this SIM, in the next few weeks.
UPDATE TO UPDATE! 4051 module is done, heavily based on the 4051 VBB sim you see here, and works great! See the post here!!!
UPDATE TO UPDATE! 4051 module is done, heavily based on the 4051 VBB sim you see here, and works great! See the post here!!!
 |
| A slider is used to send 0-5V to A0 of an Uno. 0-1V connects in 0 to the common out; 1-2V sends in 1 to out, and so on. |
UPDATE: I got confused by how to see variable values in VBB, display things to the serial monitor, etc. I needed this to debug, but I was overthinking things. It's easy. Hook up the VBB terminal to RX and TX ports as shown below, RX to TX and TX to RX, set everything to work at 57600 baud, and then use serial.begin etc. for Arduino as documented here. Works great!


OK enough for one post. Next time (or one of these times soon) I will have more SIMs to show--a CV to 4066 switcher and a trigger delay module, both of which I need in my DIY modular, like, right now.
Until next time, breathe the fumes, but only the simulated ones!


No comments:
Post a Comment